
Homemade Cat Treats-Top 5 Nutritious and Healthy Snacks
Why Your Cat Deserves Better Than Store-Bought Snacks
As a cat nutrition specialist with over a decade of experience, I’ve witnessed countless cat owners struggle with finding the perfect balance between convenience and quality when it comes to treating their beloved felines. The truth is, many commercial cat treats contain preservatives, artificial flavors, and fillers that offer little nutritional value. This is precisely why homemade cat treats have become my go-to recommendation for pet parents who genuinely care about what goes into their cat’s body.
Table of Contents
When you prepare nutritious feline snacks in your own kitchen, you gain complete control over every ingredient. You know exactly what your furry companion is consuming, and you can tailor each recipe to their specific dietary needs and taste preferences. Throughout this comprehensive guide, I’ll share my top five favorite recipes that I’ve personally tested and refined over the years, along with essential safety tips that every cat owner should know.
What Are Homemade Cat Treats?
Homemade cat treats are nutritious snacks prepared at home using fresh, cat-safe ingredients specifically chosen to meet feline dietary requirements. Unlike commercial alternatives, these DIY kitty treats contain no artificial preservatives, fillers, or questionable additives. They allow pet owners to provide species-appropriate rewards while controlling portion sizes and ingredient quality for optimal feline health.
Why Choose Homemade Cat Treats Over Commercial Options?
I remember the moment I decided to start making treats for my own cats. After reading the ingredient label on a popular commercial treat brand, I was shocked to find corn syrup, artificial colors, and ingredients I couldn’t even pronounce. That day changed everything about how I approached feline nutrition.
The Benefits You Can’t Ignore
Complete ingredient transparency stands as the primary advantage of preparing safe cat rewards at home. You select every component, ensuring nothing harmful enters your cat’s system. This becomes especially crucial for cats with food sensitivities or allergies.
Cost-effectiveness surprises many cat owners. While premium commercial treats can cost a small fortune over time, homemade alternatives use simple, affordable ingredients you probably already have in your kitchen. A single batch of DIY kitty treats can last weeks when stored properly.
Freshness matters more than most people realize. Commercial treats sit on shelves for months, sometimes years, requiring heavy preservation. Your kitchen-made snacks contain no such additives, delivering maximum nutritional value with every bite.
Customization possibilities are endless. Does your cat have kidney issues requiring low-phosphorus options? Is your feline friend on a weight management plan? You can adjust every recipe to accommodate specific health requirements.
Top 5 Nutritious and Healthy Homemade Cat Treats
After years of experimentation and feedback from both my own cats and clients’ pets, I’ve compiled these five exceptional recipes. Each one prioritizes nutrition while delivering flavors cats find irresistible.
Recipe 1: Simple Salmon Bites
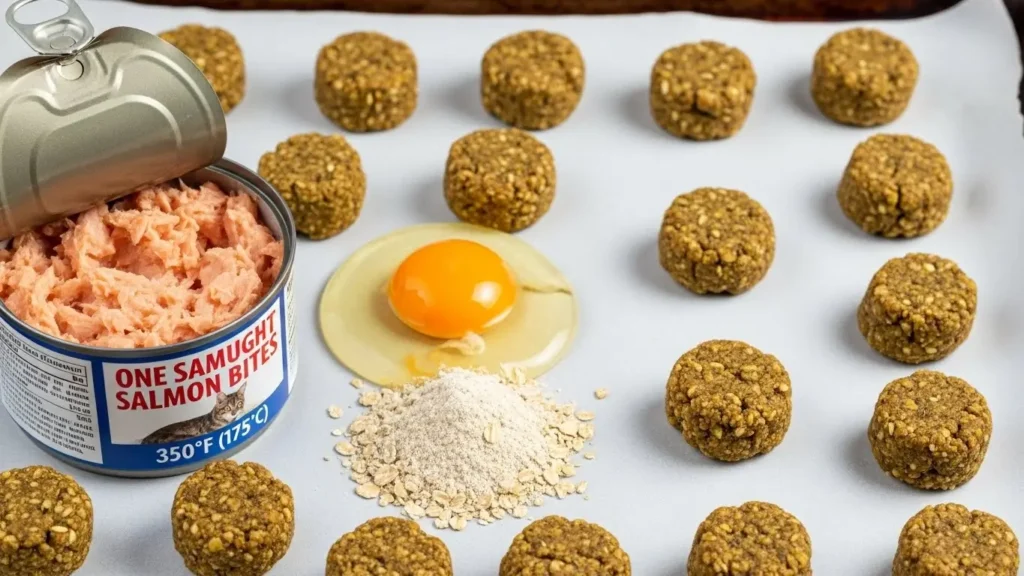
This recipe remains my absolute favorite, and I’ve yet to meet a cat who doesn’t go crazy for these protein-packed morsels.
Ingredients:
- One can of wild-caught salmon (drained)
- One egg
- Two tablespoons of oat flour
- One tablespoon of dried catnip (optional)
Instructions:
Preheat your oven to 350°F (175°C). Combine the drained salmon and egg in a mixing bowl, mashing thoroughly until well blended. Gradually add the oat flour until the mixture becomes moldable. If using catnip, fold it in gently. Roll the mixture into small, pea-sized balls and place them on a parchment-lined baking sheet. Bake for approximately 12-15 minutes until slightly golden. Allow complete cooling before serving.
Nutritional benefits: Salmon provides omega-3 fatty acids essential for healthy skin, a glossy coat, and cognitive function. The egg adds high-quality protein and essential amino acids cats require.
Recipe 2: Chicken and Pumpkin Delights
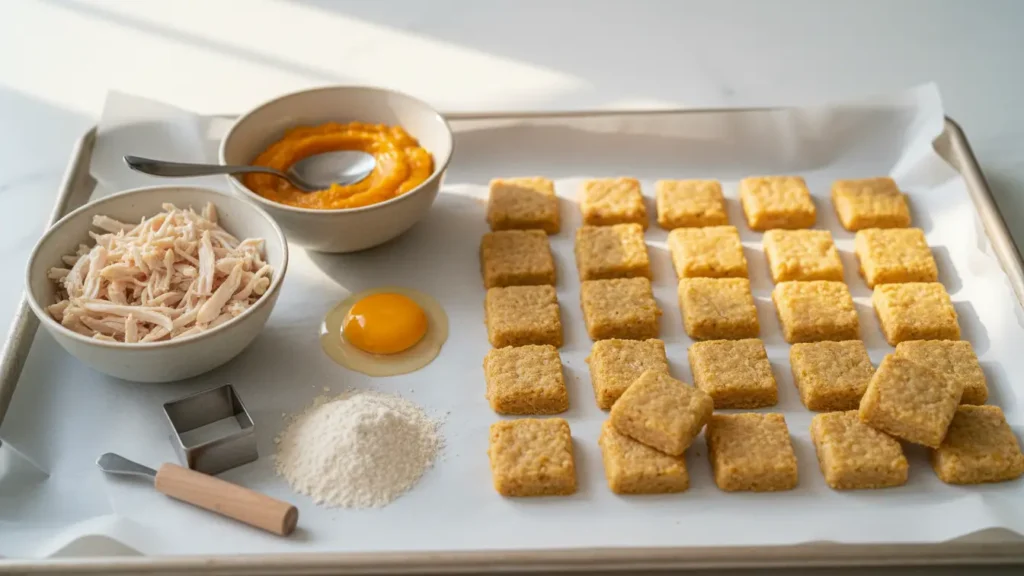
Pumpkin offers remarkable digestive benefits for cats, making this recipe particularly valuable for felines with sensitive stomachs.
Ingredients:
- Half cup of cooked, shredded chicken breast
- Two tablespoons of pure pumpkin puree (not pie filling)
- One egg yolk
- Three tablespoons of brown rice flour
Instructions:
Ensure your chicken is thoroughly cooked and finely shredded. Combine all ingredients in a bowl, mixing until a dough forms. If the mixture seems too wet, add more flour gradually. Roll out the dough to approximately quarter-inch thickness and cut into small squares or use a tiny cookie cutter. Bake at 325°F (165°C) for 20 minutes, flipping halfway through. These treats should be slightly chewy when done.
Nutritional benefits: Chicken delivers lean protein while pumpkin provides fiber that supports healthy digestion and helps prevent hairballs.
Recipe 3: Tuna Crunchies
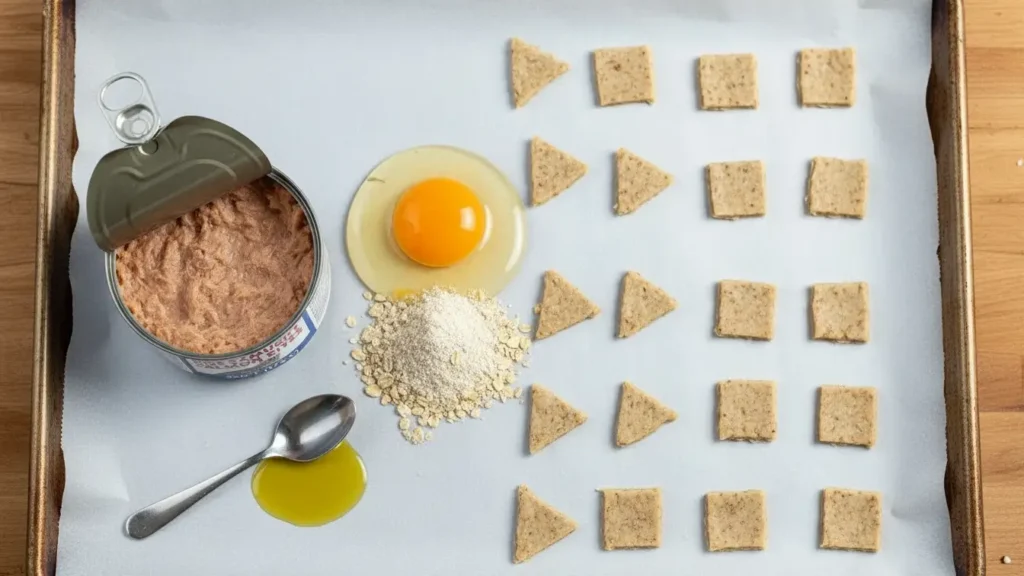
These crispy nutritious feline snacks satisfy cats who prefer texture in their treats.
Ingredients:
- One can of tuna in water (drained completely)
- One cup of oat flour
- One tablespoon of olive oil
- One egg
Instructions:
Blend the drained tuna until it reaches a smooth consistency. Mix in the egg and olive oil thoroughly. Add oat flour gradually until a stiff dough forms. Roll the dough thin, approximately one-eighth inch, for maximum crunch. Cut into tiny pieces and bake at 350°F (175°C) for 25-30 minutes until completely dry and crispy. These will harden further as they cool.
Nutritional benefits: Tuna provides protein and taurine, an amino acid essential for feline heart health and vision. Olive oil contributes healthy fats that promote coat shine.
Recipe 4: Freeze-Dried Liver Treats
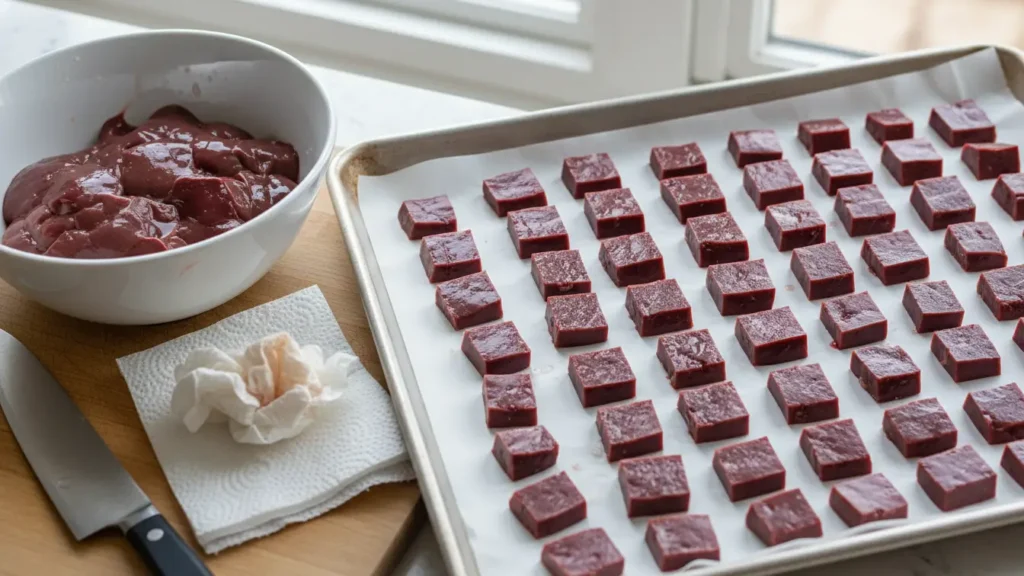
This no-bake option preserves maximum nutrients while creating an intensely flavored treat cats find absolutely irresistible.
Ingredients:
- Half pound of fresh chicken liver (organic preferred)
Instructions:
Rinse the livers thoroughly and pat completely dry. Slice into small, uniform pieces approximately half-inch thick. Place pieces on a baking sheet lined with parchment, ensuring none touch. For the freeze-drying method at home, place the sheet in your freezer for 24 hours, then transfer to a frost-free freezer section for one week, checking daily. Alternatively, use a food dehydrator at 155°F for 8-10 hours until completely dry and brittle.
Nutritional benefits: Liver serves as a nutritional powerhouse, containing vitamin A, B vitamins, iron, and copper. Cats naturally crave organ meats, making this treat particularly appealing.
Recipe 5: Sardine Training Treats
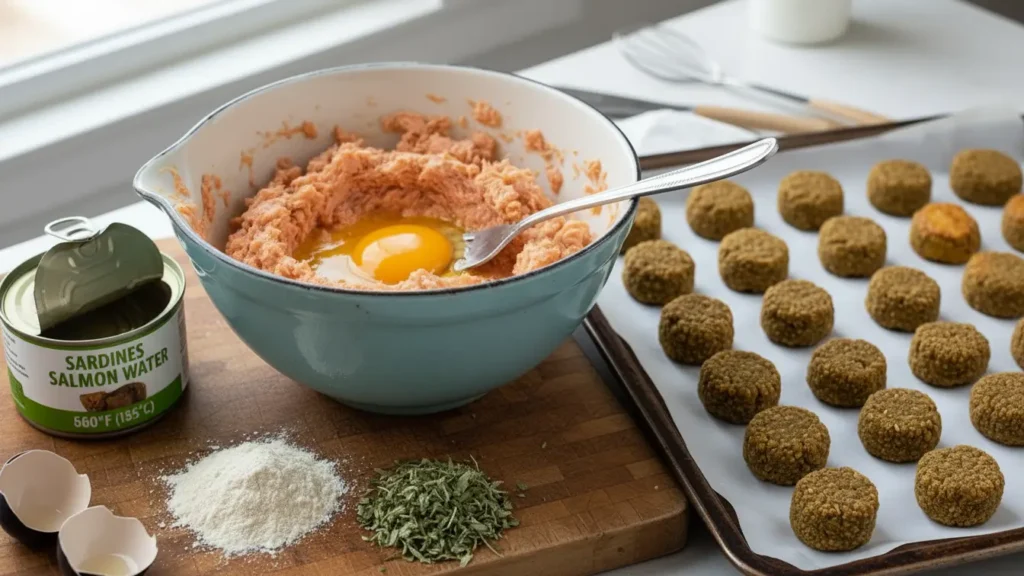
When I need to train cats or administer medication, these tiny, aromatic treats never fail.
Ingredients:
- One can of sardines in water (drained)
- Quarter cup of coconut flour
- One egg
Instructions:
Mash sardines thoroughly, removing any large bones though small, soft bones are safe and provide calcium. Beat the egg and combine with sardines. Add coconut flour until the mixture becomes workable. Form into tiny, pea-sized treats suitable for training sessions. Bake at 325°F (165°C) for 15-18 minutes. These should remain slightly soft.
Nutritional benefits: Sardines deliver exceptional omega-3 content along with calcium from the edible bones. These safe cat rewards support joint health and reduce inflammation.
Essential Safety Guidelines for Homemade Cat Treats
Creating DIY kitty treats requires understanding which foods pose dangers to feline health. Over my career, I’ve unfortunately seen the consequences when well-meaning owners unknowingly include toxic ingredients.
Foods You Must Never Include
| Toxic Ingredient | Why It’s Dangerous |
|---|---|
| Onions and Garlic | Destroys red blood cells, causing anemia |
| Grapes and Raisins | Can cause acute kidney failure |
| Chocolate | Contains theobromine, toxic to cats |
| Xylitol (artificial sweetener) | Causes dangerous blood sugar drops |
| Raw Eggs | Risk of salmonella and biotin deficiency |
| Milk and Dairy | Most cats are lactose intolerant |
| Raw Fish | Contains thiaminase, depletes vitamin B1 |
Storage Best Practices
Refrigeration remains essential for most homemade cat treats. Unlike commercial options loaded with preservatives, your fresh creations require proper storage. Most recipes stay fresh for 5-7 days when refrigerated in airtight containers.
Freezing extends shelf life significantly. Prepare large batches and freeze portions, thawing as needed. Frozen treats typically maintain quality for up to three months.
Portion control deserves serious attention. Even healthy treats contribute calories. I recommend treats comprise no more than 10% of your cat’s daily caloric intake.
How to Introduce Homemade Cat Treats Successfully
Transitioning from commercial to nutritious feline snacks requires patience. Cats notoriously resist dietary changes, and I’ve learned several strategies that ease this process.

Start by offering tiny amounts of one recipe. Watch for any adverse reactions over 24-48 hours before providing more. Some cats embrace new foods immediately while others need gradual introduction over several days.
Consider your cat’s texture preferences. Some felines prefer crunchy treats while others favor softer options. The recipes I’ve shared offer variety to accommodate different preferences.
Temperature matters surprisingly often. Many cats prefer treats at room temperature rather than cold from the refrigerator. Letting treats warm slightly before serving often increases acceptance.
Frequently Asked Questions About Homemade Cat Treats
How long do homemade cat treats last?
Most refrigerated homemade cat treats remain fresh for 5-7 days when stored in airtight containers. Frozen treats maintain quality for up to three months. Always check for any signs of mold or unusual odors before serving, and when in doubt, discard and prepare a fresh batch.
Can kittens eat homemade treats?
Kittens over 8 weeks old can enjoy appropriately sized homemade treats in moderation. However, their primary nutrition should come from complete kitten food. Treats should remain an occasional reward, and portions should be adjusted to their smaller size.
Are homemade treats better for cats with allergies?
Absolutely. DIY kitty treats allow complete ingredient control, enabling you to eliminate common allergens like grains, certain proteins, or additives that trigger reactions. This customization proves invaluable for cats with diagnosed food sensitivities.
How many homemade treats can I give my cat daily?
Treats, whether commercial or homemade, should constitute no more than 10% of your cat’s daily caloric intake. For an average 10-pound cat, this translates to approximately 20-25 calories from treats daily, roughly 3-5 small treats depending on the recipe.
Can I substitute ingredients in these recipes?
Yes, with caution. You can often swap similar proteins, replacing chicken with turkey for example. However, always verify that substitute ingredients are cat-safe before using them. Never substitute ingredients without confirming their safety for feline consumption.
Conclusion: The Joy of Creating Homemade Cat Treats
Throughout my years working with cats and their devoted owners, nothing brings me greater satisfaction than seeing the bond strengthened through thoughtful nutrition. When you take time to prepare homemade cat treats, you’re doing far more than creating snacks. You’re expressing love through action, prioritizing your cat’s health, and gaining peace of mind knowing exactly what your feline companion consumes.
The five recipes I’ve shared represent my most trusted, thoroughly tested options. Each one delivers genuine nutritional benefits while providing flavors cats genuinely love. I encourage you to start with whichever recipe appeals most and gradually expand your repertoire.
Remember, your cat doesn’t need elaborate culinary creations. Simple, fresh, species-appropriate ingredients prepared with care will always surpass commercial alternatives packed with preservatives and fillers. Your kitchen already contains most of what you need to begin this rewarding journey.
Your cat’s health, happiness, and the grateful purrs you’ll receive make every moment spent preparing these nutritious feline snacks worthwhile. Welcome to the wonderful world of homemade cat treat creation—your feline friend will thank you with every delicious bite.